
Note:
This is a pipeline setup that works with a custom OTA library that I wrote for ESP32, plus other OpenSource projects and services. You can setup your own pipeline for free of cost.
What is CI / CD
CI or Continuous Integration -
CI is a set of steps for the developer to follow to maintain the standard of the codebase. This is the barebone structure of the process -
- Check in code in frequently.
- Automate the build and test portion.
- Always test the code locally before checking it in.
- Never merge any failed branches to the main branch.
- Return its status back to successful if you’re the developer who causes the failed build or test.
- Make it your top priority to do so once the fail happens.
CD or Continuous Delivery/Deployment -
CD is more of continuation to CI. Generally the will be lot of work involved in order to deploy new application. Stop running processes, swap binaries, restart services in the required order and this is time consuming. The same applies even if its a on premise application, might be little simple, but still present. Create the right package - only the changes or the complete binaries, deploy on the CDS, notify user/application and handle the load.
So it is suitable to automate this process and in most of the time it remains constant through out the lifecycle of the application. CD can usually have different kinds of triggers, run a CD on commit, run a CD at specific time interval or have a manual trigger.
Pipeline in Hardware projects ?
A CI/CD pipeline is almost always present in software based organizations. Without one its almost impossible to maintain quality and standard in the development and sanity of the master branch. All code goes through unit tests and the commits are run against automated test scripts or tested in sandbox envs.
But what about personal projects ? Especially Hardware projects ? when compared to software applications, in addition to all the steps involved, there is one more step of flashing to the board. So all the more reason to have a automated pipeline for this.
Setup your own pipeline -
There are two parts to this process, the client side or ESP code for checking for updates, and the backend side for CI/CD pipeline.
ESP32 / hardware side -
Lets look at the ESP side, the board can either poll the server time to time, or if there is a persistent connection, the server can inform when there is an update available. As an IoT endpoint, such devices will generally not have a public IP or if it is low power based, connection cannot be kept alive.
But if there is a requirement for the update to delivered as soon as its available, MQTT can be used for so that server can notify, and its designed for low power consumption.
In my case, the update cycle is more relaxed. ESP periodically checks with backend if there are any updates, so there will be couple of minutes of delay before the ESP checks and downloads the update. This depends on the checking interval defined.
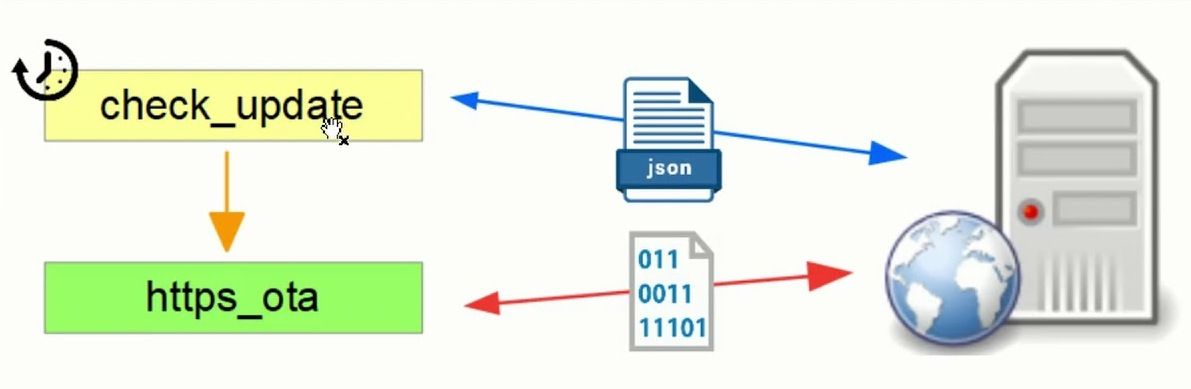
Going into more specifics, the ESP will ask the backend for the latest version of the ESP firmware. After we get the response, the version is checked against its own firmware. If the version on backend is greater, then the new firmware is downloaded. There is a MD5 check for the binary downloaded to make sure that it is the right file (no man-in-middle attack 😅) and there are not corruptions at downloading. After the check is passed the new update is applied.
Its good to note that even if faulty binary is flashed as part of the OTA, the ESP will never be rendered dead. On the soft reset after the update, if the ESP is not able to boot, it will roll back to the previous version. This is possible because the update will be flashed to new partition and moving back to old firmware is as simple as changing partition address in the lookup table. A great video on this if you are interested.
Right now the OTA library for ESP32 is in my private repo, still needs some testing. I will add it here as soon as possible or checkout by GitHub repos.
Backend / dev pipeline -
In this article I will be using GitHub for version control, Continuous Integration and Continuous Deployment. And PlatformIO as the framework for ESP32 projects, rather that arduino.
- Use your favorite IDE and create a project or make changes to existing one. I use VS Code as it has the PlatformIO as an extension within its marketplace.
- Compile, test and verify the changes. Push to GitHub repo.
- Use GitHub workflows / actions to automate the build and deploy.
- Setup a CDN server to deliver the firmware binaries to ESPs.
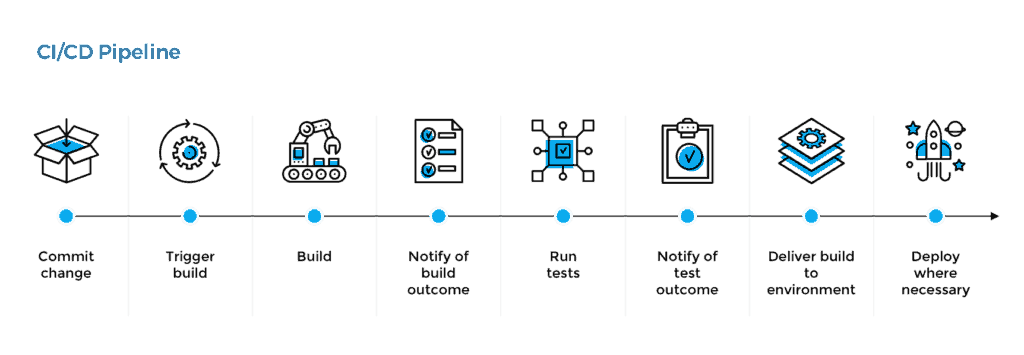
There are three main sections in the workflow - Trigger, Env setup, Run process
Trigger - the YML scripts should have a trigger, when to start the workflow. In my script above, the scripts are executed on each push to the master branch on remote or on pull request (not required in my case 😅).
Env setup - Once the workflow starts, a virtual machine is given to you. You can choose the OS and its versions as well. I have picked latest version available of Ubuntu. Setup the Dev tools and libraries required to run your scripts. In the example above I have installed python and required libraries - platformIO and pyGitHub.
Run process - Execute your scripts in this newly setup machine to compile the code and test it. Also to deploy the build.
The logic is simple, if the commit that triggered the Action has the Version defined which is more that the version on the cdn server, then this means that the code is meant to be deployed. So the new version details are updated in the cdn server and the binary is compiled for upload.
CDN server-
You can use any provider (aws, azure, google..) or setup a raspberry pi at home as a Content delivery Server. The function of this server is to serve static resource on request, so a free static resource services will be sufficient.
If you want some kind of processing or authentication to be performed at the backend, and you know that the updates are not very often, then FAAS like AWS Lambda or Google Functions can also be setup. This way you will only be charged per request (or processing duration) and no need to keep a server running all the time.
I have setup mine at - http://cdn.rbklabs.in/
That's all folks
You can now have a professional setup for your projects and don't have to worry about plugging out your board from the project and physically uploading the new code. Just push the commit and sit back 😊.